Starting the program:
At starting you have to select three information:
You get the splash screen during load time. When you have the window the program is ready to start.
 |
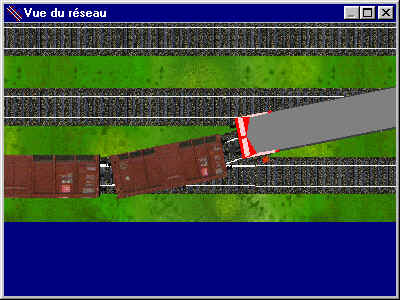
Their's at network already done on disk, with track, some element of decor and a train. Go to the menu Files/Load and go to the folder "Petit-train 3D\Fleischmann" to find a *.res file. The network will show like the picture beside. Their's some other example in this directory. |
Menu bar:
The menu bar allow to manipulate quickly the view screen (from left to right you'll find):

Visualisation:
To run the train you have to switch from "Edition mode" to "Visualisation mode". Click on "Visu." button and if all conditions are good you get no message. This conditions are:
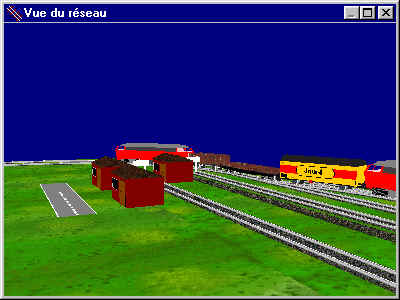
When you run the train you get one of the 4 view show here after. Depending of what element and mode you have selected you get more or less interesting view. You're free to test all combinaison but some are not interesting sometimes.
 |
General view: you can change camera angle with the mouse or with arrow key. Press right mouse button and move it from left to right for rotation (or left and right key), up and down to change angle (or up and down key). |
 |
Up view: camera follow the selected element. Press right+left mouse button and move up and down to change camera height. If you select a wagon you can move around using right mouse button and move the mouse. |
 |
Inside view: camera turn on around up axe. You can use right button mouse and move from left to right or use arrow key to turn the camera. |
 |
Pursuit view: the first element is the one you follow and the second where the camera is (It's not interesting to follow ourself). |
Moving:
To move the train you must set a speed and a direction. For that use the cursor on the menu bar. By clicking on the right, the speed is positive and the train move forward. By clicking on left the speed is negative and the train move backward. The speed is indicated in milimeters by second (mm/s). You can use + and - key to change the speed.
Changing of track:
You can change your direction directly on screen. Click on a
track and you can see that the red position cube is moving. This
can done only if no train is on this track (Like in the real
world it's not possible to change direction when your train in on
this track or you'll have a big desaster).
If you arrive on a track in the wrong way, it switch during train
passage and get back to is normal possition after.
End track stop your train if you arrive on it with positive or
negative speed.
If you want to go beyond:
The network you have use is ready to go but you can also start
from a blank project. In the menu select "New" to erase
the project. You start with nothing, no network, no decor and no
train. For the moment track are form Fleischmann HO catalog.
Because in the reality track are more flexible it'll always
connect. Here you have to get an interval less than 1 mm to
connect tracks. Their's a special track of 13 mm to put in some
case in your network to adjust dimension.
I hope to create other set of track, but for the moment what I
see in catalog make me think that dimension indicated by
constructor are not the real one. (In fact when I generate a
complete set and try to create a network in catalog that'll not
connect: tracks are not front to front, their's big differences
beetwen two track ...)
If you have real size for a complete set (length, radius and connection position), I'm interested to include it in this program. Send me a mail if you have more information.
Tracks to build a network:
| In "Edition mode" Double-Clik on the window to add a track. A popup menu appear. Select "Add" to get the same window as show here. Choose in the list one track, for example this one. Click on "Valid" button and your track is put where you have double-click before. Move your mouse to another position and hit "Ctrl+V" to add a second same track on screen. |  |
| Now you have two track that are not connected like this picture. Move the mouve over the edge of a track and a green bar appear. Click on the left mouse button to select this point. |  |
| Move the mouse and you see that the point now appear with a blue bar. Move the mouse to another edge of another track available and a green bar appear. |  |
| Click with the left mouse button. The two track are connected and you have something like the picture like this. Edge point that are connected are now not available and appear in red if you put the mouse over this point. |  |
| Repeat this operation to add tracks. You can use
other form and dimension to close the network. When two
track are closer than 1 mm it'll connect automaticly. A
message box indicate distance beetwen this two point. You
don't have to indicate coordinate, the program put tracks
side by side. You can delete a track by double-click on it. The popup menu appear, click on "Delete". You can use "Crtl+X" to do this instead. |
 |
When the network is closed, the "View" button is available and indicate that a train is able to run on this track.
Some decor to look better:
| To add a decor you have to follow the same way that to add a track. Double-clik on the screen and select "Add". In the new window select "Decor" on the radio button to have access to the list of decor. Select for example the little house and clik on "Valid" button. A decor is add at the last mouse position. |  |
| Decor are see on top. In the case of the little house you can see the roof. To put at the position requiered use the right mouse button to move it. By double-click on left mouse button you get popup menu where you can change angle. Change the value to another one in degree (-359 to 359). |  |
In Editon mode you can use all this command:
Assemble a train:
Your network is closed, you have put some decor. It's not enough to start. You've to assemble your train with at least one motrice. Go to the menu and choose "Train". A new window appear. With the >> and << buttons add and remove wagons in the train. When you've finished quit this window and click on "Visu." button. You'll switch to Visualisation mode if all is well done.

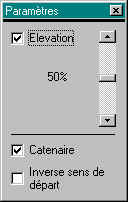
Some parameters:
In this window you can change some option before go
to Visulisation mode:
|
 |
List of elements:
Select in menu "Inventory" to start a window with all elements. This allow to known how many of each element you have. You can print the list if you want to reprodure the same network in a real model. It's indicate dimension you need to put your network and decors.